 |
 |
|
|
|
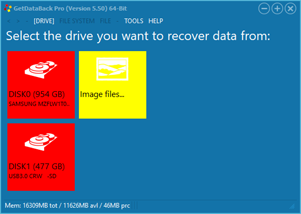
GetDataBack's first screen lists all available physical drives along with their characteristics.
Click on the drive you want to recover the lost data from. Red tiles represent physical drives. Each tile contains information about the drive, such as name and capacity. Typically, you would click on the second tile labeled DISK1.You can also load an image file (.img) you had previously created. Click on the yellow tile and navigate to the image file. Once you click Open, the image is added as a yellow tile to the existing tiles. You can now select the image in the same way you would select a physical drive. You can also open virtual images (.vim), for example, representing a RAID array that you created previously with RAID Reconstructor.
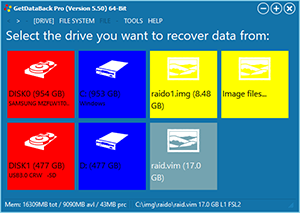
Usually, physical drives, images, or virtual images are all you need. If you wish to add logical drives (C:, D:, etc.) to the screen, you can do so by going to TOOLS->Settings->Miscellaneous and check Show logical drives. This checkbox adds a blue tile to the screen. Clicking on it adds all compatible logical drives as blue tiles. The second screenshot on the right side shows red tiles for physical drives, blue tiles for logical drives, and yellow tiles for images and virtual images.
Right-clicking a tile and selecting Drive info, or going to DRIVE->Drive info (Drive) displays valuable information about a particular drive.
After clicking on the drive you want to recover, or going to DRIVE->Recover drive->(drive), GetDataBack immediately begins its analysis, looking for file systems on the selected drive. GetDataBack knows 4 distinctive sophistication levels and automatically picks the appropriate level. Should the need arise, you can set the minimum level in TOOLS->Settings->Data Recovery->Data recovery->Initial level. Once the recovery process started, you can watch its course in the progress window. In the example above, we clicked on the 17 GB Virtual Image raid.vim.
The scan should take a couple of seconds up to a couple of minutes. If it takes significantly longer, there are three possible reasons:
GetDataBack's first screen is also the place where you would load a recovery you previously ran.
At this point, you can create an image of a drive if you like. An image is a good idea, especially if a drive has bad sectors.
If you want to run GetDataBack with settings other than the default settings, you can do so in TOOLS->Settings. For example, you could limit the types of file systems to look for or change the sophistication level.
At any given time, the status line contains information about GetDataBack's current status, memory consumption, etc.
See also: Drives, Scanning the drive, Create Image, Load recovery, Sophistication level