Virtual Images are short text files describing the data to be loaded. Thus, you can glue together different data sources. This is especially helpful if you want to recover RAID arrays. RAID Reconstructor creates virtual images that you can use in Runtime's Captain Nemo, GetDataBack, or DiskExplorer.
Virtual images always have the extension "vim".
You can also create your own virtual images. Virtual images are XML files with just a couple of commands ("tags"). You can put together any number of drives.
This is the root tag that encloses all other tags.
Example:
    <virtualimage>
    :
    :(other tags)
    :
    </virtualimage>
This tag sets the sector number of the virtual image to a new value. Any gaps you create by that will be filled with 0's.
Example:
    <virtualimage>
    :
        <sector>1000</sector>
    :
    </virtualimage>
This tag describes a drive that is being used. You can also specify a certain area inside that drive.
NOTE: Physical drives DISK0, DISK1, etc., are described using the legacy notation HD128, HD129, etc.
Example:
    <virtualimage>
        <drive>HD128:</drive>
    </virtualimage>
This example of a virtual image uses your first hard drive (HD128:). Make sure you always append a colon to the drive's name.
Another example:
    <virtualimage>
        <drive>HD128:0-999</drive>
        <drive>c:\images\myimage.img:1000-</drive>
    </virtualimage>
This example maps the first 1000 sectors of HD128 to your virtual image. Sector 1000 and up of your virtual image is sourced from sector 1000 and up of the image file "c:\images\myimage.img". The ranges are specified by appending two numbers, separated by a dash. The range extends to the end of the respective drive if you leave out the second number.
Example with a NULL drive:
    <virtualimage>
        <drive>NULL:0-8000000000</drive>
    </virtualimage>
This defines a drive with 4 TB that you can open with Captain Nemo, GetDataBack, or DiskExplorer.
NULL drive example with labeled and numbered sectors:
    <virtualimage>
        <drive>NULL(Sector Number):0-8000000000</drive>
    </virtualimage>
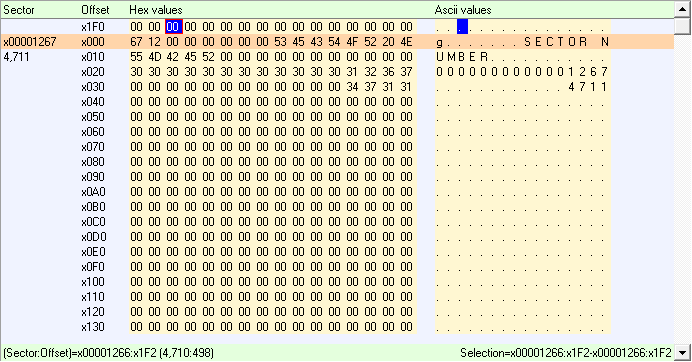
This creates a virtual 4 TB drive with numbered sector numbers. Look at how sector 4711 would look like:
This is a useful feature for research purposes. When experimenting with RAID fragments, you can see where a sector originated.
Possible drive names are:
| HD128:, HD129:, etc | DISK0 (1st physical drive), DISK1 (2nd physical drive), etc. |
| FD0:, FD1: | 1st, 2nd floppy drive |
| C:, D:, etc. | Logical volume C:, D:, etc. |
| myfile.img, myfile.imc | Image files |
| NULL: | Virtual drive, delivers empty sectors. Must be followed by a range. |
| NULL(sometext): | Like NULL:, delivers labeled and numbered sectors. |
| NULL(n): | Like NULL:, but fills drive with number n. |
| NULL(random): | Like NULL:, but fills drive with random number n. |
| NULL(randomn): | Like NULL(random):, but fills drive with random numbers 0..n |
| NULL(randseed): | Like NULL(random):, but with repeatable random numbers |
| NULL(randseedn): | Like NULL(randomn):, but with repeatable random numbers |
| NULL(sometextn): | Mix of NULL(sometext): and NULL(randseedn) |
| BYTES(12 34 ab cd) | Generates a drive whose first sector begins with 12 34 ab cd. Size of drive is rounded up to the next sector boundary |
| BOOT(code,no=1, fs=ntfs,bootable=false, start=63, count=10000000) | Emulates a drive with exactly one sector with a partition table that contains one partition |
| BOOT(fs=gpt) | Emulates a container GPT MBR |
Use the <loop> tag to define RAID arrays.
Example definition of a 3 drive RAID-5 with a block size of 128, backward rotation:
    <virtualimage>
        <loop>
            <drive>c:\img\raid5\r1.img:</drive>
            <drive>c:\img\raid5\r2.img:</drive>
            <drive>c:\img\raid5\r3.img:</drive>
            <cycle blocksize="128">
                <stripe>1,2</stripe>
                <stripe>1,3</stripe>
                <stripe>2,3</stripe>
            </cycle>
        </loop>
    </virtualimage>
After the <loop> tag, specify the drives you use in the RAID. On the syntax of the <drive> tag, see the specification above.
In the <cycle> tag, define the stripes making up the RAID. Each stripe is a sequence of data taken from the previously defined drives. Define the block size as an attribute for the <cycle> tag. You would read the example above as:
Take 128 sectors from the 1st drive (sectors 0-127).
Take 128 sectors from the 2nd drive (sectors 0-127).
Take 128 sectors from the 1st drive (sectors 128-255).
Take 128 sectors from the 3rd drive (sectors 128-255).
Take 128 sectors from the 2nd drive (sectors 256-383).
Take 128 sectors from the 3rd drive (sectors 256-383).
That continues until the end of one drive has been reached. The smallest drive determines the size of the loop. If the smallest drive is 10,000 sectors, the total size is 20,000 rounded up to a full cycle, which is 20,736. You can change the size of the loop in two ways:
1) Specify the number of times the loop should be repeated. You can do this by adding an attribute with the name "repeat" to the <loop> tag, e.g.: <loop repeat="27">. In the RAID example, repeating the cycle 27 times yields 6*128*27 sectors, which is 20,736.
2) Specify a range. Do this by adding the attribute "range" to the <loop> tag, e.g.: <loop range="10-20".
The "repeat" takes precedence over the implicit size as determined by the drives. The "range" takes precedence over the "repeat".
You can even define incomplete RAID-5 arrays. If, in the example above, the 3rd drive would be missing, you could describe the array like that:
    <virtualimage>
        <loop>
            <drive>c:\img\raid5\r1.img:</drive>
            <drive>c:\img\raid5\r2.img:</drive>
            <cycle blocksize="128">
                <stripe>1,2</stripe>
                <stripe>1,1x2</stripe>
                <stripe>2,1x2</stripe>
            </cycle>
        </loop>
    </virtualimage>
The expression 1x2 will calculate the missing sector, originally on the 3rd drive, using the XOR operation.
For special purposes, e.g. RAID-6, you can also use a read-ahead modifier: 1x2(1) would read 128 sectors from drive 1 and XOR those with 128 sectors read from drive 2 at 128 sectors ahead. Another modifier is the Reed-Solomon modifier r, e.g. ?r2r3r4 on a RAID-6. Read more...
The <stripe> tag can have a "repeat" attribute, e.g.
<stripe repeat="16">1,2</stripe>
This will cause a repeat of the <stripe> tag sixteen times.
This tag does not change the Virtual Image. It is only information for
programs using the VIM file, such as Captain Nemo.
For example,
<searchbootranges>64200-64300;8450200-8450300;12643200-12643300</searchbootranges>
will instruct Captain Nemo to look for boot records at the sectors indicated.
See also: Drives, Image files