Email: info@runtime.org , Web: http://www.runtime.org
RAID Reconstructor © 2003-2024 by Runtime Software LLC
| |
Phone (USA): +1-888-777-6960 Email: info@runtime.org , Web: http://www.runtime.org |
Runtime's RAID Reconstructor is a tool for both, destriping and analyzing unknown RAID arrays. RAID Reconstructor is the the only product on the market that is able to determine unknown RAID parameters, such as start sector, block size, rotation and drive order. Simply enter the RAID type (RAID-0 or RAID-5) and your drive fragments. After clicking a button a couple of times, RAID Reconstructor will come up with the RAID parameters. The only thing left to do is to mount this RAID structure in Captain Nemo or GetDataBack and copy your files. If your parameters are not found with the first try, tweaking some options might do the job. Do not hesitate to email our support at support@runtime.org.
Runtime's RAID Reconstructor will help you to recover data from a broken
Even if you do not know the RAID parameters, such as start sector, drive order, block size and direction of rotation, RAID Reconstructor will analyze your drives and determine the correct values. You will then be able to create a copy of the reconstructed RAID in a virtual image, an image file or on a physical drive. Once you created an image you can mount it with Captain Nemo or use it for further data recovery processing with Runtime's GetDataBack. If you create the image on another physical drive, you can process it with Captain Nemo or GetDataBack too or you might even be able to directly boot from it.
RAID Reconstructor is read-only. It will not try to "fix" your RAID. It will merely create a copy of your RAID at another location. It will collect sector by sector from each single drive involved and write these sectors in the correct order to the designated destination. This process is also called "destriping".
Possible destinations for the destriping process are:
Because one drive is redundant in RAID-5, it is sufficient to have one less than the original number of drives (N) in the array. RAID Reconstructor can recalculate the original data from the N-1 drives. For a RAID-0 (striped) array you will need all drives.
The RAID Reconstructor will recover both, hardware and software RAIDs.
IMPORTANT NOTE: DO NOT WRITE ANYTHING ONTO THE DRIVES YOU ARE RECONSTRUCTING. THIS INCLUDES THIS SOFTWARE, ANY OTHER TOOLS, FILES OR PROGRAMS.
Check out our installation hints.
There are few easy steps to follow:
|
(1) |
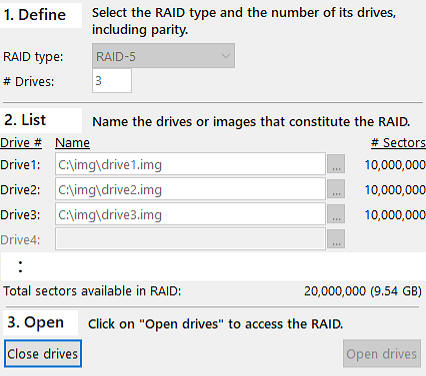
Select the RAID type and number of drives
Example: RAID-5 array consisting of 3 drives.
|
|
(2) |
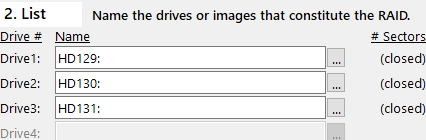
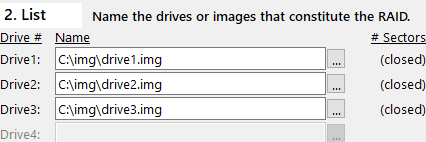
List the drives or images to be analyzed
Example: RAID-5 array consisting of 3 drives, hooked up to your computer as individual physical drives HD129:, HD130:, HD131:
Example: RAID-5 array consisting of 3 image files, previously created on your local drive C:\img as drive1.img, drive2.img, and drive3.img.
You can also mix physical drives and image files.
|
|
(3) |
Open the drives Click "Open drives" and make sure the correct capacities are shown on the right side. Also, the total capacity of the RAID should be shown on the bottom:
NOTE: For RAID-5 it is possible to enter one drive less than the original array size. If you need to do this you would still set the number of drives to 3 in the example above, but leave one drive entry empty.
|
|
(4) |
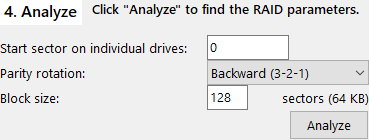
Analyze the RAID components and determine the correct drive order, block size and direction of rotation. This function is the brain of RAID Reconstructor. If you know the correct parameters you can enter them here and skip the analysis, going directly to (5) Copy. Otherwise click "Analyze" and start the analysis wizard.
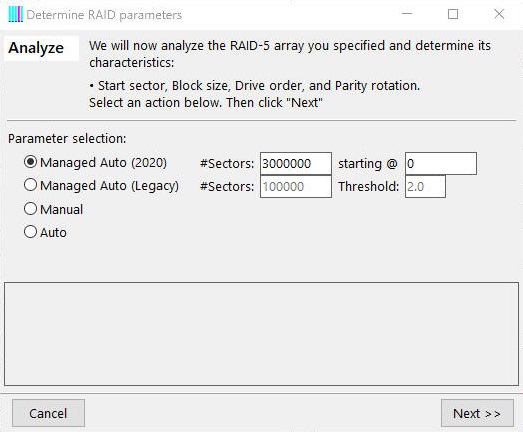
The Analysis Wizard The wizard's first screen asks how you want the analysis to proceed. Select "Managed Auto (2020)". This will perform a pre-test in order to eliminate unlikely combinations. If you want to skip that pre-test and test all possible settings, select "Manual". If you want to run the pre-test and do not wish to review the parameters, select "Auto". "Managed Auto (Legacy)" mimics the pre-test used in previous versions of RAID Reconstructor. Click "Next".
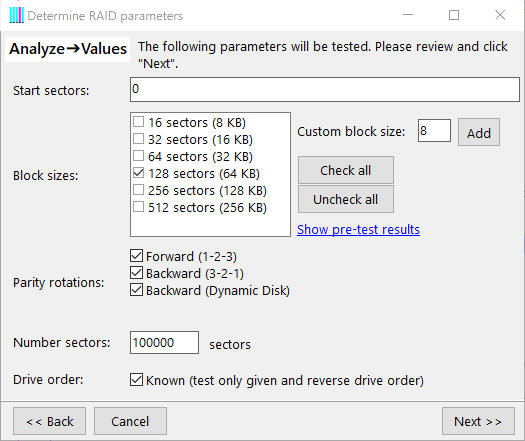
RAID Reconstructor is now going to perform the pre-test, which will take a couple of minutes. Upon completions the wizard will present you the following screen:
This screen shows the combinations that will be probed.
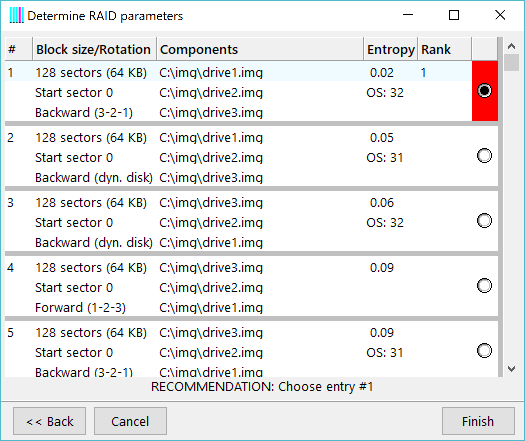
Click "Next". Depending on the number of drives, the number of combinations to check and the number of sectors to probe the analysis can last a few seconds or several hours. When done you will be presented a list of drive parameters with the most probable one colored in red:
Usually you will choose the recommended first entry. Interpretation of the data: In the example above you can see a 3-line entry for possible permutations of the following parameters:
The list is showing no more than 10 combinations for each start sector. These 10 combinations were found to be the most likely ones. All others had been discarded. Each combination is checked if the resulting data "make sense". Each evaluation is given a value, called "entropy". The smaller this value is the more likely the entry represents the correct RAID parameters. The value of the best (first) entry should be at least 20% smaller than any other entry for a given start sector. If there is no such entry you will not get the recommendation above, but the warning "THIS RESULT IS NOT SIGNIFICANT!". If you get this message, most likely something is wrong. Additional information is provided if there was a file system on the broken RAID. Just below the entropy you can see an "OS:" followed by a number. RAID Reconstructor tries to parse the master boot record found in RAID sector 0. Depending on the integrity of the file system for the given combination it assigns two digits. They have the following meaning: The left digit is the number of partitions found. The right digits is the number of partitions that actually point to a valid file system boot record. Note: The information above is only provided if the RAID in question is a hardware RAID. Choose the desired entry (most probably the first one) and click Finish. This copies the selected parameters into the main screen. If you have a significantly small entropy (compared to others) and a high OS:xx value as in the example above, there is usually no doubt that this combination is the one you are looking for. If not you must look closer. If there are several combinations with almost the same values you might redo the analysis with a higher number of sample sectors (see above). You might also evaluate the "Start sector of the RAID" and run the XOR test tool. If you still do not get significant results you will have to determine the right ones with try and error: create a Virtual Image, check if you get your data with Captain Nemo or GetDataBack, try the next combination. If you still do not get your data you can order our RaidProbe service and we will determine the parameters for you.
|
(5) |
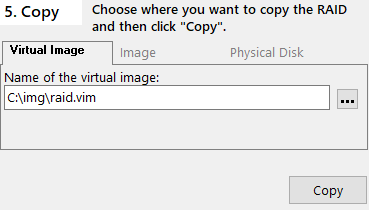
Copy the RAID Now you are ready to copy the RAID into a virtual image, another image file or another drive. If you choose "image file" or "drive", the destination must be large enough to hold the whole RAID. We recommend you choose the "virtual image". This is just a small text file that you will mount with Captain Nemo or load into GetDataBack in order to complete your recovery. Alternative 1) Copy To A Virtual Image
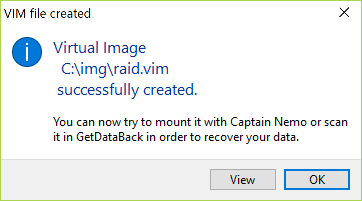
Specify the name of the virtual image. Click on the button to the right of this field to open the file dialog and enter a virtual image name, such as "c:\img\raid.vim". The name must have the extension "vim". Click "Copy". It takes less than a second to write the virtual image.
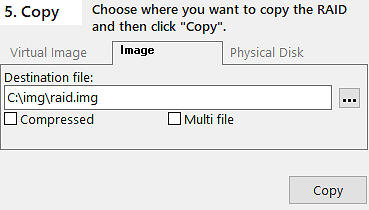
Alternative 2) Copy To an Image
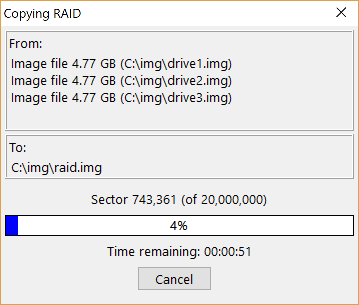
Specify the destination in the field "Destination file". Click on the button to the right of this field to open the file dialog. Enter an image file name, such as "c:\img\raid.img". The recommended file name extension is ".img", which will create a regular image file. A ".imc" extension will create a compressed image file. If you check the "Multi file" box the created image file be split into several files of 650 MB each. This might be necessary for file systems that do not support large file, such as FAT32. Click "Copy". The RAID now gets reconstructed. This can take a while.
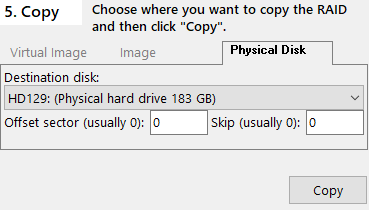
If any errors are encountered, messages are written into a file called "<program path>\log<n>.txt", where "<program path>" is the directory the RAID Reconstructor is located in and "<n>" is a number. From the main windows you can later check these messages by clicking Tools->View Log on the menu bar. Alternative 3) Copy To a Physical Disk IMPORTANT NOTE: DO NOT USE ANY OF THE SOURCE DRIVES AS A "TARGET". IF YOU COPY TO A PHYSICAL DRIVE, ALL DATA ON IT WILL BE DESTROYED. BE SURE YOU CHOOSE THE CORRECT DRIVE.
Specify the destination in the field "Destination disk". Click on the combo box to select a drive from a list. You will pick a physical drive name, such as "HD129:". Offset Sector: When copying to a physical drive, you can specify an offset sector where the transfer begins. For example, choosing a value of 63 will cause the first sector of the reconstructed image to be copied to sector 63 of the destination disk, the second sector to sector 64, etc. Skip: Number of sectors not to copy from source. Click "Copy". Read and acknowledge the warning. The RAID now gets reconstructed. This can take a while. If any errors are encountered, messages are written into a file called "<program path>\log<n>.txt", where "<program path>" is the directory the RAID Reconstructor is located in and "<n>" is a number. From the main windows you can later check these messages by clicking Tools->View Log on the menu bar.
|
(6) |
What's next? If there was little or no file system damage to your RAID, we recommend you try to mount the created virtual image, image or drive with Captain Nemo. Download a copy of Captain Nemo here: http://www.runtime.org/nemopro.zip. If you are unable to mount the image with Captain Nemo, obtain a copy of GetDataBack at http://www.runtime.org/gdbprosetup.exe and feed it with the created virtual image, image or drive. For more information see GetDataBack's documentation. If you copied the RAID to another drive you need to reboot your computer. If you are lucky this drive can be read from your OS without further problems.
|
If you have any questions about this software, contact our support!
If you need information about licensing this software click here.
See also: